Wednesday, November 24, 2010

Tied Up With Ribbon

Still working on Christmas Cards--here's another one I made that was super simple to make...and no stamping either.  It's a pedestal card aka easel card -- Splitcoast Stampers has an easy to follow tutorial on how to make these cards.  If you're not a member, it's free to join.  There are SO many resources you can find on their site--it's one of my favorite places to "hang out".  I used decorative Bo Bunny Christmas CS (layered over white, light blue, & ivory CS) -- I loved how the embossed/glittered design, tied up with satin ribbon, made it look like a beautiful package.  So I added the vellum "favorite things" saying, & a vellum tag (December 25) to finish the card.  This is actually one of my favorite cards--didn't take long to make, and didn't even get my hands dirty.  Ummm, okay--I actually like getting my hands dirty, but I still had fun making it.  =)

Well, I'm off here--gotta get prepping for tomorrow's Turkey dinner!  I'm thinking I'll start with a batch of cookies...Yummy!  =)

Woo Hoo--I made the Top 3!

I'm SO excited!  In an earlier post (As Summer Waves Good-bye)  I entered a challenge over at Simon Says Stamp & Show for showing my favorite Tim Holtz stamp, and I found out I was picked as one of the Top 3!  I am now proudly displaying my "Blinkie" on my sidebar!  A big thank you goes out to Simon Says...for a great blog & store!  You can check out their blog HERE, and shop at their online store HERE

I just had to share--thanks for "listening".  =)
Lisa

Tuesday, November 23, 2010

Thankful For...

What are you thankful for?  With Thanksgiving quickly approaching I find myself quite nostalgic of Thanksgivings past.  Being a military family away from "home", I really appreciate the times we've been able to get home for Thanksgiving--as well as our family coming and visiting us.  This year, it will just be the three of us since our older son isn't able to join us either--However, we'll still have our traditional large Turkey dinner I'll be preparing, since my DH loves his leftovers.  I love cooking (and eating), so I actually look forward to it.  I'm so thankful for my family!

But I wanted to actually create this post in honor of my son, Cody.  He came home yesterday asking to bake cookies for his teachers -- he's been taking a Foods class this semester and loves it.  He's always helped me out in the kitchen from time to time, and last year I was telling him I wanted him to start learning to do a bit more cooking & baking--so that when he gets on his own in a few years he can take care of himself (and maybe invite his parents over for dinner sometime).  That's when he decided he'd take a Foods class during his 10th grade year--and it's strictly cooking, so he's really enjoying it.  Anyway...I digress--I guess he had talked to my DH about helping a girl in his class pass out cookies for her.  She asked him to give a cookie to a particular teacher, and that teacher happened to be talking with another teacher at the time.  He had only one cookie to give and felt terrible that the other one was left out--that's when he decided to come home and bake some himself.  He wanted some for his teachers, extras--just in case, and enough left over for our family too.  I was so impressed--and proud.  Cody has such a good heart--I'm so Thankful for Cody!

I stayed up a bit longer last night to do up some quick cookie packets--he would've been happy just handing them out with a napkin--but it was simple process.  I stamped "Thankful For"  (Stampin' Up Elegant Beginnings stamps) on the front of leafprint scrapbook cardstock (CS), folded it in half and stapled it the top of the cello bags they were packaged in.  I used Tim Holtz' Odds & Ends ticket stamp 'Limited Edition' for the back, and Cody added his name.  I was going to have Cody write the teacher's names on each, but thought that would be too time consuming to rummage through and find the right one.  So instead I stamped "you" and overstamped with a CTMH leaf print, before attaching it to the front of the bag.  For a quick treat bag I thought they turned out well.   As he was leaving for the bus this morning he had one in hand for the bus driver--now won't that be a nice surprise!


I'm Thankful For You--all my blog readers & blog guests!
I'd like to wish you all a very Happy Thanksgiving! 
And may God bless you and your loves ones! 
Lisa

Saturday, November 20, 2010

Making Cards - Color Me Happy!

I love making cards!  It's one of those "crafty" things that always takes me to that Happy place...speaking of which, I'm running rather late this time adding my post to this week's challenge over at Simon Says Stamp & Show.  This week the challenge was--"Whatever Makes You Happy", and for me, making cards definitely fits that challenge.  But what makes me even happier, is to sneak in a bit of repurposing while I'm at it.  Oh, yeah!

For this card:  I used standard white cardstock for the base, covering the front with deco paper from the DCWV Holiday Collection, Winter Matstack (collection of winter words) leaving a small border.  I stamped my snowflakes & message (CTMH New Fallen Snow stamp set) with VersaMark & clear embossing powder & covered the entire card with Chipped Sapphire Distress ink.  I used a silver Uniball gel pen for some added snow splatter, & added a taffeta wired ribbon.  Finally...I repurposed a Christmas card I received last year by cutting out the tree image and adding pop dots to make it stand out.  

I love that the snowy words are in the background lurking behind the Chipped Sapphire, while the embossed snowflakes reveal a bit more.  How "cool" is that?!  =)

Thanks for stopping by!  Lisa

Tuesday, November 16, 2010

One Tissue Box

Just a quick post to show what I did with just one tissue box...and I still had a few pieces left over (I could've made a collage card out of those--next time).  I used the front/back panels of the box for a card and the note tag, the top of the box for the oval window card, one and half sides for the teacup, and the rest of the side for the small tag.  One of the sides of the tissue box usually has a bar-code engraved in it.  I used that piece for my small tag, and just covered it up.  I've used the teacup before in a side-step card on an earlier post (Anyone Got A Tissue?).  I thought this one would be a nice place card at the table--I used a small container behind it to add a teabag, or some treats, etc.  I didn't have to take a lot of time on these cards--Quick & Easy!  And seriously...would you have know it all came from a tissue box?  =)

Happy Crafting!!
Lisa

Nature's Beauty - A Challenge & Repurposing too

I'm loving the Compendium of Curiosities Challenges (CCC #22) over at Linda's Studio L3.  I haven't played with my alcohol inks in a while, and this was the perfect opportunity.  The challenges are taken out of Tim Holtz' book Compendium of Curiosities -- this one was from page 52, Alcohol Ink Splatter.  And so much fun!!  I picked out the stamps I wanted to use first--Tim Holtz' Mini Holidays2 & Reindeer Flight, in which I used the two different sizes of trees.  I used the smaller size for my background and the larger size for my overlay, stamped on acetate/plastic.  Which brings me to the repurposing part--I used glossy cardstock I had been saving from various packaging, and the plastic was recycled from another package I just couldn't throw away.  The glossy cardstock was a great find, originally used as a liner in one my of packages--it wasn't as solid as traditional cardstock, but it worked great.  I probably had more bleed through than using traditional glossy cardstock, but no one ever sees the back side.  Oh, wait--guess what...I used that too!  ha ha...  For the quote by Helen Keller (CTMH stamp set "Beautiful Things") I used the back of a portion of my alcohol splatter project...I liked the softer look for the sentiment.  For the main portion of my card I used Tim's technique as in his book with the following colors:  Lettuce, Meadow, Pesto, Willow, Slate, Cloudy Blue, & Gold Mixative.  Yep--I used a lot of color. I stamped on the plastic, heat set it, cut it out and wrapped it with a wire ribbon, strung some lights, and popped dot it to my card. My tree star was a blue button--so I colored it with the gold mixative & blending solution before adding it to my tree.

NOTE:  I don't receive any compensation for recommending products, but this is too cool not to pass on.  I wanted to make a quick mention of my Non-stick Craft Sheet by Ranger Industries.  Whether I'm crafting at home or teaching a class I always use this craft mat.  It's awesome!  I purposely photographed my card on my craft mat so you could see the splatters from my ink before I cleaned it.  What is so cool about this mat, is that nothing sticks to it--glue, paint, ink, embossing powder, etc...it all wipes up so easily, and no bleed through.  You can iron on it, heat set, emboss, & more--it even repels water.  Seriously, I love this mat!  Okay...that was my public service announcement---moving right along...   =)

This was the first time I've attempted this technique and boy was it fun! If you haven't gone out and bought Compendium of Curiosities yet, you're gonna want to add it to your Christmas list--if you can wait that long.

Thanks for stopping by...and come again!


Lisa

Friday, November 12, 2010

A Christmas Snow Surprise

For those of you looking for a bit of inspiration in making your Christmas Cards this year, I plan on randomly posting cards I'm making--some are super quick & easy, others will include a variety of techniques.  It's rare that I'll make any two cards the exact same since I tend to recycle a variety of items--but I might repeat a style I really like, technique, or card type.  This is one of those cards themes that I really enjoy playing around with--mostly because I really like the snowy effect.  Though hard to see in this photo, the snow really does glistens in the light, but I didn't use any glitter.  Actually, I made my own imitation snow--it's sturdy enough to stay in one place on the card when moved steadily about, yet when shaken it gives that snow flurry effect before settling back into the drifts (this is some durable faux snow).  Keep reading and I'll explain how I made it.

LoveLee Recipe: 
For the Card:  I used DCWV Holiday Collection Winter Matstack for the background papers...mounted on white CS (cardstock).  I used my Cuttlebug to cut & emboss the frame from green CS before inking the raised areas with Pine Needles Distress ink.  I cut a piece of thin plastic packaging and adhered it behind the frame with Scor-Tape (or any strong dry adhesive).  Using TH Mini Holidays2 stamp set I used Versa-Mark to stamp the snowman & tree images onto the snowflake background paper and heat embossed with CTMH embossing powders.  On the back of the frame I used one layer of mounting foam strips all around the perimeter of the frame making sure to leave no gaps.  I lightly rubbed an embossing buddy (light dusting of baby powder will work too) over the snowflake background, and plastic, before adding the "snow" to the plastic portion of my frame--this keeps the snow from building up static on the plastic.  I removed the backing off the mounting foam, exposing the adhesive, and carefully added the snowflake background to the frame before finally adhering the snow-filled frame to the card base.  Finished off with a blue/silver ribbon, and hand-wrote the message.  And now for my favorite part which involves repurposing, of course--the "Snow"!

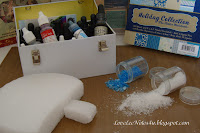
For the Faux Snow:  Simply this - take a piece of Styrofoam (the gritty kind) and cut it in half.  Rub the two halves together over a file folder or glitter tray to catch the "snow".  Surprise--that's it!  Easy Peasy!  The possibilities of how you decide to use it are endless; craft projects, in a jar with snowman parts (eyes, nose, scarf, hat, etc.) for a melted snowman, snow globes, cards, and much more.  Isn't this "cool"?!  =)  Okay...it gets better.  Use a prescription bottle, jar, or even a baggie and fill it about 1/2 way with your homemade snow (or with the amount you desire--just leave 1-2" from top).  Add a drop of any color re-inker, close the lid and shake it up for the color to disburse evenly (I start with one drop, and add more as needed).  I used blue re-inker to make some textured water in one of my projects, and batches of greens for wreaths and trees.  Try adding a bit of Diamond Glaze (or Glossy Accents) sparingly to mold it to your projects -- makes great clumpy snow.  And the Styrofoam shavings naturally glisten! 

Try it--I bet you'll be surprised at how many ideas you can come up with.  If you do, leave me a comment with your project link -- I'd love to see it!  Oh--one more tip...when you're working with your faux snow, whatever you do--don't sneeze!

As always, thanks for stopping by! 
Lisa

Thursday, November 11, 2010

Veteran's Day - Remembering

Growing up I can remember my parents talking about how poorly our Vietnam Vets were treated when they returned from war--that left quite an impact on me as I grew up of how important it is for us to recognize our military members' service, both past & present.  If you don't know the history of Veteran's Day, you can check it out ---> HERE. 

In the meantime, I just wanted to post my sincere gratefulness to all who have served, and are currently serving in our military -- including my husband who is currently serving in the USAF, my father who served in the Army (now in heaven), my grandfather who served as a Marine in the Korean War (also in heaven--hanging out with my dad), my father-in-law currently serving in the USAF, my brother-in-law currently serving in the USAF, my husband's uncle who served in the Navy, and so many more friends & family members that have served or are currently serving our country.  I thank you for your service!


My wonderful hubby!


My Dad in 1957
Oh how I miss him!


G'pa with G'ma & I
He was always proud to be a Marine!


God Bless You All! 
w/Love, Lisa

Wednesday, November 10, 2010

As Summer Waves Good-bye - challenges combined

I thought I'd participate in two challenges with this tag -- Studio L3's Compendium of Curiosities Challenge 21, and Simon Says Stamp & Show Your Favorite Tim Holtz Stamp

Fall is my absolute favorite season...which makes Tim Holtz' Falling Leaves stamp set (4 leaves border stamp) my favorite!  I took the border stamp of four different leaves and, dare I say, cut them into four separate stamps--however I didn't cut the excess rubber off so that I could easily fit them back together on an acrylic block if I decide later to use it as a border.  So I guess if I say that the "Leaves Border" stamp is my favorite, then that gives me a bit more bang...4 in 1!  =)  ahem...moving right along --

For the Perfect Distress challenge I followed the directions in Tim Holtz book "Compendium of Curiosities" page 38 using Pine Needles Distress ink & Perfect Pearls Forever Green with TH Shabby French stamp set (wildflowers).  The base of my tag consisted of Antique Linen Distress ink & Vintage Photo, over-stamping using black archival ink with TH Letters to Santa stamp set (script).  I used lots of fun Distress ink colors for the leaves:  Rusty Hinge, Wild Honey, Aged Mahogany, Fired Brick, Forest Moss, Crushed Olive, & Vintage Photo--adding some light veining with my Zig black marking pen, & a light spray of pearl mist before scrunching into shape.  I circle punched the sun, distressed the edges & inked with Wild Honey & Rusty Hinge, adding "rays" to the tag directly behind it.  My message was stamped with CTMH Summer's Wave stamp set in Vintage Photo Distress ink on metallic vellum--veined on the back of the vellum with Pine Needles Distress and a Fantastix nub, and edged with Wild Honey.

Finally, my tag was finished with some fun "Fall" fibers & a metal leaf brad.  I had thought this would look great on an Autumn themed card, but when I held it up to the window the light shown through in all the right places and really popped both the sun & the perfect distress greens...so now I'm looking for a small frame, or something I can attach it to, so it can hang in my window before the seasons change once again. 

Tuesday, November 9, 2010

Lincoln's Birthday Brochure Book & a Coin!

In a previous post, Paper Bag Books - Disney Vaca, I talked about the paper bag book I made for my DH for his birthday in 2009.  I had planned a trip to Springfield, IL to visit President Lincoln's home town and such (DH's favorite President).  I had obtained a brochure from the area and since Lincoln's 200th birthday celebration was going on at the time the brochure was all about visiting everything Lincoln!  I thought it would be great to condense it down to a smaller, more portable size and make it a bit more interactive--which ended up making it a great gift to showcase the trip I planned.  So using the brochure and paper lunch sacks I put together "Lincoln's Birthday Brochure Book", adding ribbon and a few embellishments, and finally leaving a bit of room for some pictures, once our trip was complete.  There were some great facts & trivia from the brochure that I made into tag cards to fit into the pockets of the bags--I left the back of the tags blank for additional photos/journaling.  And when we returned from our trip I added our tickets from seeing Lincoln's home & Presidential Museum which had even more trivia on them, as well as a few other bits of ephemera we collected. 

And since this all coincided with our local base USAF Arts & Crafts show (Fall 2009), I decided to enter the book into the show.  How exciting, and what an honor it was when I received a "Special Achievement Coin" for it, as well as it being chosen as one of the online gallery items showcased from our base, for the U.S. Air Force (2010)!  Woo Hoo!!  What a blessing!


This brochure book initially took about three hours to make--we took it with us on our trip, and it was invaluable for helping us navigate the places we really wanted to see while there.  I hope you enjoyed taking a look--you can see a picture of the coin I received on the side bar of my blog...thanks for stopping by!

Saturday, November 6, 2010

Repurposed: Bagged Cards

I've been busy this week working on my Christmas Cards--I'll be sharing these periodically, but I wanted to get a quick post in about some cards I made from some gift bags I'd been saving from Starbucks!  I wonder if you might remember when they came out with the Kraft Paper style gift bags at Christmas, with the red/white snow scenes?  I kept several of them and cut out scenes I thought I might use later for cards.  See if any of the scenes look familiar.  These are just a few of them...quick & simple!

Just added ribbon

Applied to white cardstock with hand-written message

Inked the edges with white ink; added vellum stickers, vellum message
with snowflake brad, and red metallic cording
Keep an eye out this Christmas season as your gifts are bagged at the store...you might just find some interesting materials you can repurpose & put to good use for all kinds of projects...including, of course, Christmas Cards, wrapping paper, or even after Christmas thank you cards.