Wednesday, June 29, 2011

Road Trip - Bike Rentals

I joined in a Vacation Tag swap at the All Things Tim (ATT) yahoo group -- where we created six tags using one or more Tim Holtz products, and we'll get six tags in return.  I've already seen a few sneak peaks of the other tags, and they're all great.  For my tags, I decided to give a little twist on the vacation plans.  With all the flight delays & cancellations these days, might not be a bad idea to invest in a bike.  =)  Anyway, I couldn't resist having a little fun.  Hope those that get my tags enjoy them.  I used three different paper designs, but otherwise they're the same. 


LoveLee Recipe:
DCWV Tradewinds Matstack
Tim Holtz Passenger Ticket stamp
Tim Holtz Bicycle stamp
Assorted travel stamps: Road Trip Adventure, Sign Post & Compass
Paper Studio Sophie-Alpha stamps
Chatterbox Brad Maker
Distress Inks:  Barn Door, Tea Dye, Walnut Stain,
Sunflower Sparkle Perfect Pearls
manila folder (for passenger ticket)
assorted ribbon/fibers

Thanks for stopping by!  Lisa

Saturday, June 25, 2011

Cody's Book - 16 years of Memories


At long last, my son's Memory Book is complete!  Nathan received his book at 16 years old, and two years later, when Cody was 12 yrs, he was talking about how he couldn't wait until he turned 16.  When I asked him why, thinking it was so he could drive, he said so he could have a memory book too.  If you haven't seen Nathan's book, it can be viewed ---> HERE.  For Cody's book I wanted to do it a bit different -- starting with the covers.  I love how Nathan's covers turned out--but because I used foam core, it meant I had to be creative with my binding solution because typical ring binders wouldn't allow the covers to lay flat or turn easily.  Also, using the binding method I used for Nathan's book also meant it would take work to add more pages.

In case you haven't read the posting about Nathan's book, I should begin by explain a bit about this project.  I didn't have any girls to enjoy a Sweet 16 party with, and I sort of felt that the boys were cheated out of a wonderful birthday--well...because they were boys.  My Sweet 16th was one of my most favorite birthdays (you can read a bit about it on Nathan's book post)...and I wanted theirs to be memorable as well.  Years ago my MIL had given me a book about Kindness that talked about writing letters to the newborn baby while they were little and reading them when they got older.  Nathan was about 15 at the time and I thought, why couldn't I do that for the boys for their 16th?! 

In preparation, I sent letters to all of our family/relatives & friends, and the boys' friends, special teachers, youth pastors...etc, asking them to use an 8 1/2 x 11 sized paper, and write a note for his birthday--adding something they remembered about Cody, and include a picture as well.  They could embellish the page as much or as little as they'd like, or they could leave it up to me to put it together.  In many cases, the easiest for most people to do was to email me what they wanted to say, and I put it together for them.  The ones that didn't have photos handy to send, I spent time looking for photos to put with it.  Needless to say, this went out to a LOT of people. The response I had for both boys--even six years apart--has been overwhelmingly wonderful (both boys' books are over 3" thick)!  Which also explains why I've been lagging on doing much else. 

For Cody's binder, I found a green 3" binder (where the cover opens flat) at Target.  I decided to use a binder because I wanted to use sheet protectors for the memory pages & photo pages, and I knew more would be coming in after his birthday and wanted it to be easier to add in pages.  Since I wanted the covers to be my own, I altered them by covering them with canvas--I used white 12x12 Sticky Back Canvas, and stained them with Antique Linen Distress Stain.  I used one piece for the front, one for the back, and reinforced the spine with part of a third piece of canvas after it was stained.  The canvas really absorbs the stain well.  I didn't need to stain the areas I planned on covering with other materials.  I found some great Bo Bunny cardstock in their Cambridge line that I thought matched Cody's personality and added some flat embellishments of stickers & stamped quotes.  I also found this great acetate (Vintage Moon Collection-Paislee Pages) in a 25 cent bin and secured it over the cardstock with brads.  I used score tape underneath the frame on three sides to secure a photo between the cardstock & the acetate--but made allowances for the picture to be changed if desired.  I repeated this same technique for the back cover.  To adhere the cardstock to the canvas I used Claudine Hellmuth's Studio Multi Medium.  I love how the cardstock lays flat on the canvas without bubbling, and is completely secured to the canvas--I'm loving that Studio Medium stuff!  I also used cardstock on the inside and adhered it inside the cover pockets with score tape, and also to the the center of the hardware closure.  To completely cover the remaining green that was showing, I used a pale gold leafing pen.  For his bookmark I used a laminated tag I had made for his percussion instrument several years ago, and secured it with metallic cording to the binder--it fits perfectly in the center of his book when not in use.


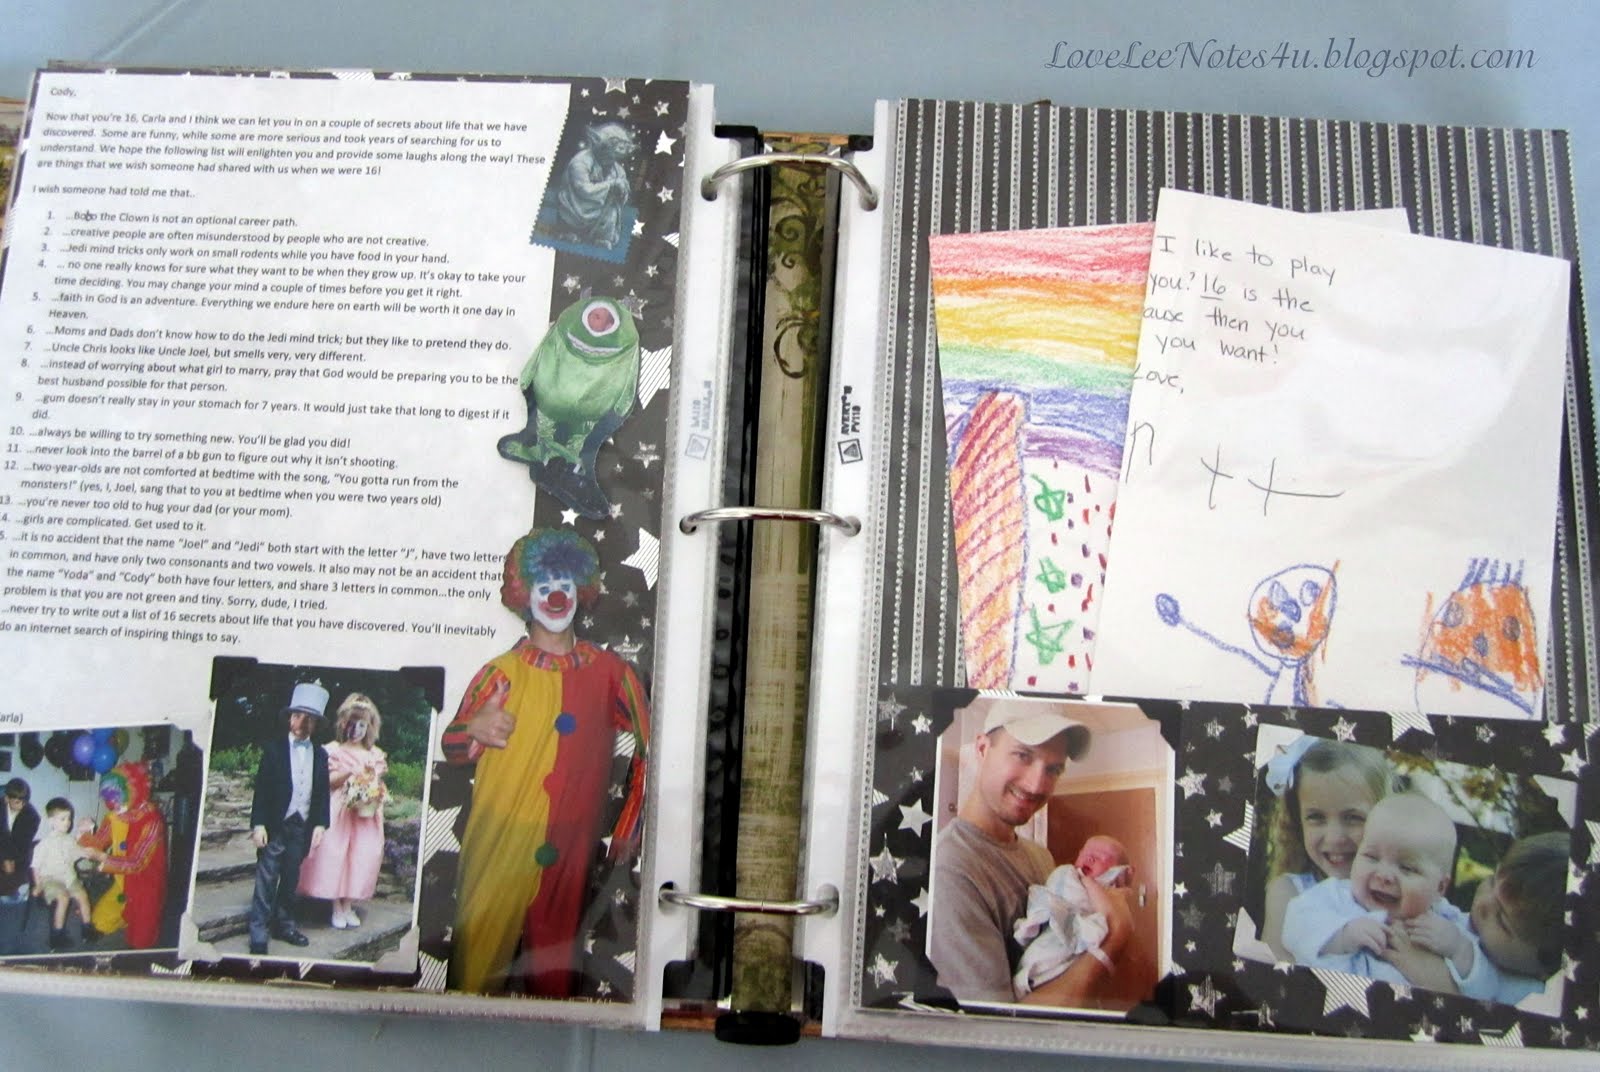
For my pages in the book, I wrote highlights from each year of his life so far -- I ended up having 9 pages in Cody's book!  I guess sometimes you just have to know when to stop.  ha ha...  I've had a lot of people ask how I could remember all that stuff.  Basically, my long term memory is much better than my short term memory.  But in addition to that, I looked at baby books, pictures, and memorabilia -- and that helped a lot.  Unfortunately, I'm really not much of a scrapbooker--REALLY.  So most of my pictures were in boxes (which is sad).  But I've started feeling motivated to getting some scrapbooks done -- I guess we'll see.  =)  I'm still adding elements to pages, such as journaling, embellishments, stamping, etc. -- I guess it's just hard to let it go.  ha ha...

I'm really pleased how both the boys' Memory Books turned out.  They're both different, but will be equally cherished.  I remember Nathan saying when he was going through a hard time that he just pulled out his Memory Book and knew that people cared about him.  Sometimes we forget that our teenage boys, though rough around the edges, have a sensitive side as well.  Some of those who originally contributed to Nathan's book have since passed away...including my Dad.  These memories will last a lifetime, as they're shared with their children some day.  I feel good about that. 

Please enjoy this brief look at Cody's Memory Book.  You can click on any picture to enlarge it.


For everyone that contributed to Cody's book, I want to say how much I appreciate you taking the time to show you care.  It has meant so much to Cody (who has read it all, and keeps picking it up to read some more), and also to both Chris & I.  We're overwhelmed by your willingness to participate in this wonderful adventure....and we humbly thank you!

God Bless--Lisa

Friday, June 24, 2011

Craft Scrubbie Holder

I love my Craft Scrubbie by Ranger Ink!  This wonderful little scrubber gets nearly all (if not all) the ink & gunk off your hands after a messing bout of crafting (a great buy for less than $5)!  And somehow I always seem to work up to the minute I have to go somewhere, and by getting this scrubbie wet and adding some liquid soap I'm able to clean up quickly & efficiently--and totally safe for the kiddos too.  I highly recommend this little beauty!  Which leads me to my little repurposed project today -- When I first got it I would leave my scrubbie on the sink and then pack it back in the plastic packaging for my craft bag, but it fit SO well into one of those travel soap containers that I started carting it around with me in one of those. 

The travel soap box I had was solid white and boring -- so I decided to give it more pizzaz!  Working on a non-stick craft sheet, I used Tim Holtz felt applicator and dabbed on TH Adirondack alcohol inks in various colors/shades:  Latte, Butterscotch, Cranberry, Current, Eggplant, & metallic Silver.  I did a lot of experimenting with colors, so there could be more.  The master of alcohol ink (Tim Holtz) makes mention in his techniques that you'll have to know when to stop--he wasn't kidding.  Ha ha...  He's got some great tutorials for using alcohol ink -- here's a good one to get your feet wet ---> HERE.  You're gonna love what all these inks can do!

I used a die cut circle in the same colors I used on the soap box and added some silver gel pen dots, and wrote craft scrubbie with a black sharpie.  Then I laminated it, cut it out and adherd it to the front of the box with foam dots.  The foam and plastic keep any water that comes in contact with it at bay.  I used the Ultimate glue to adhere the sheer silver ribbon to the inside of the lid--mostly a decorate element, but you could actually create a handle for your box this way as well.  I've picked my box up by the ribbon on occassion and it's held up quite well.

Sorry I don't have a "before" picture,
but hopefully the white on the inside gives you the idea.
A couple of things to note...before you begin your project, you'll want to wipe down your clean soap box with alcohol to remove any oils or residues.  Also, I did not ink the inside of my box or the bottom -- but that's entirely optional as water doesn't affect the alcohol inks once they are dry. 

Well, that's it for today -- wow...can you believe two posts this week?!

Thanks for checkin' in -- I hope your weekend is fabulous!  Lisa

Thursday, June 23, 2011

Graduation Book of Memories

Sorry guys--I've been so busy working on my son's Memory Book that I haven't had a moment to blog.  But I've just finished it for his birthday and I'll be posting more on that hopefully this weekend.  In the meantime, I wanted to show you another version of a Memory Book that I created for my niece Emily's recent graduation.  If you like the idea of having a book filled with memories people write for your child, this is a great (& simple) way to do it. 

I bought an 8x8 album (already covered in faux fur) -- I covered the inside covers with scrapbook paper, added glittered chipboard letters to the front with the Ultimate Glue, and some photo corners & acetate for her picture, and added some picture pockets inside in addition to the 8x8 pages.  Then, I found these great 4x6 cards at Michaels along with some coasters & a luggage tag -- all in the dollar bins (plus I used a coupon!).  I used the luggage tag to make her a bookmark.  The 4x6 cards were for friends & family to write their memories of Emily on--then they were added to the picture pockets, and pictures were added to the photo pages as well.  My sister set these cards out at her party and asked those that attended to write a memory/congratulatory wishes on the cards, and added them to her book.  Some family members had already added a few pages, such as our family.  Some of the 8x8 pages were also used as collages and such.  I also changed the plain white pages to decorative scrapbook papers in matching color themes --some of the 8x8 pages can also become pockets for cards/memorabilia she'd like to keep as well.

I have to give a BIG shout out to my hubby who photographed my niece for her Senior pictures.  He did an amazing job!  If you'd like to see more of his work (including the Blue Angels), you can check out his new Facebook (FB) Page - C U Smile Production.  You'll need to be logged into FB to get the link, or you can type CUSmileProduction in the search feature for FB.  I can't wait for him to take Cody's Senior/Grad pictures!


Grad Card matching papers & fibers in book.

I hope this inspires you to create a memory book for your loved one. 
Have a lovely day!  Lisa

Tuesday, June 14, 2011

SNT Tuesday - Change Your Binding Solutions

Hello Bloggers. I'm sorry this is later getting posted than I'd hoped...today we celebrated my son's 16th birthday with his friends, and I'm just back to getting settled in for the night.  But I wanted to post a quick tip for today: solutions for changing your binding pages for books & minis, and more, when it's already pre-set for a specific binding technique (i.e. changing from 3 ring binder holes to Bind-it-All or Cinch type holes, etc.).

I came up with this idea when I found some 4x6 photo pages on clearance for 75% off. I bought lots of them so I could make a photo book for my hubby's photography. The thing is...he had just bought me a Bind-it-All (BIA) for Christmas and I wanted to finally use it to bind his photography book, but the pages I bought all had three holes with slits for use in a post bound album.

Enter Tim Holtz Tissue Tape!! This stuff is amazing!! It's sticky backed tissue with an adhesive that allows you to position it in place and reposition it again without any residue coming off on your project, or ripping the paper.

So how did I fix my binding dilemma? I decided to wrap the binding edges of the photo pages with the tissue tape! That's it! I simply wrapped the tape completely around the edges top to bottom and effectively sealed off the original post holes and I ran the pages through my BIA for the new binding!


You could probably use masking tape or something similar if you didn't have Tissue Tape, but I love that he has made a wonderful variety of designs. Also, he has a lot of other ideas and things you can do with this Tissue Tape as well on his Blog (Tissue Tape Ideas), including adding color! I chose to leave mine as is, but this Tissue Tape is very versatile.

You might be able to click on the photo to enlarge it
and just make out the holes that were covered up by the
Tissue Tape.  I tried to point out the more obvious ones.
I'll post a bit more about the completed photography book in a later post -- keep in mind that it was my first time to use my Bind-it-All. You'll get to see my mistakes...ha ha...and hopefully not make the same ones I did.

Anyway, thanks for stopping by. Lisa

Sunday, June 12, 2011

Krafty Distress Tag

Today I'm showing a Tag using Kraft Glassine Paper & Distress Ink for two blog challenges:  Linda at Studio L3 is continuing Grungy Monday with #10 using Distress Ink, and for Simon Says Stamp & Show creating a Tag.  I'm using Tim Holtz distress ink techniques, and decided to also use Tim Holtz Kraft Glassine paper as well.  He recently published a post that gave step-by-step techniques on how to work with this fabulous paper...check it out HERE.

I used one of his embossing folders to emboss the tag, and then applied Chipped Sapphire distress ink on both sides with blending foam.  For the Kraft Glassine I stamped Tim's Umbrella Man stamp for the image then heated the paper as Tim demonstrated on his blog--I loved it so much that I decided to add a quote as well.  I crinkled the glassine a bit and added more distress ink and then...my favorite touch...I used another TH embossing folder to emboss another Umbrella Man slightly askew to give it some extra dimension!  I think it looks like a "rain shadow"...but that's probably just me.  lol.  Finished off the front with some Jute and blue velvet ribbon before using TH Tiny Attacher add staples holding the glassine in place.

For the back I added a quote I just love from C.S. Lewis on vellum, over some Bo Bunny cardstock...adding again more Distress ink.  I kept this tag fairly simple by using only one color Distress ink -- and I'm pleased with the outcome. 


 I'm adding this to my son's Memory Book, which is turning out so much better than I'd hoped!  I can't wait for you to see it--soon.

Thanks for stopping by!  Have a lovely day!  Lisa

Saturday, June 11, 2011

A Supercalifragilistic Proper English Tea - Tea Party Part5


A Supercalifragilistic Proper English Tea
"Practically Perfect in Every Way"
 Well, today is the final installment of my five part Tea Party series!  If you are just joining in, you can click on the links for the other postings:

Tea Party Part1 - The Theme
Tea Party Part2 - The Menu
Tea Party Part3 - 1200+ Cricut Cuts
Tea Party Part4 - The Decorations

Today I'm ending the series with the actual event highlights--and integrating all the other parts of the series into the "main event".  This was SO much fun, but definitely a lot of work went into it.  Though we had a planning team of six, we had some extra help with the decorations and food assembly which really helped in final preparations.  One of the things that made this tea party so fun was that several men & teenage boys from our church, including my husband & son, waited on us ladies!  They plated the food, served the food & beverages, and even washed the dishes!  You might even say that they were at our "beck and call".  Just don't tell my hubby I said that -- LOL.  They weren't so interested in our tea party food for sustenance...so we made sure to have plenty of pizza for their hearty appetites.

I guess the best way to tell the story is through pictures, and there's a lot -- but I hope you enjoy the journey!

Morning of...sandwich prep!  Audra, Marilyn, & Marion
   
Before the guests arrive


Menu, Table Number, and Tea & Conversation Cards

Parasols for the "young" ladies, and Door Prize baskets.
Door Prize questions were based on the Tea & Conversation Cards!
Final preparations for a cute skit dancing with umbrellas
Let the tea party begin!

Tea Time with friends

Mary Poppins (aka Julie) has arrived!
My son, Cody, waiting tables

My husband, Chris, in the background helping the guests.

Our waiter serving tea to Marilyn & her Mom

"First of all I would like to make one thing quite clear...
I never explain anything."

Jenny Land, our speaker (Julie's sister)
Spoke on our conversation w/God, and each other...
a wonderful speaker!

Alice in Wonderland teacup, brought by one of our guests.
I love this tea cup -- I'm a big Alice fan!
Our wonderful planning group for this fabulous tea party:
Audra, me, Julie, Lisa, Marilyn, & Debbie

It was so nice to have my guys here,
since I didn't have any family nearby!
It also wasn't half bad to be waited on by them either.  LOL

Finishing the dishes -- and happy about it!
John, Marilyn's hubby, and Chris...mine.  =)
Now if they'd only do this at home...[sigh]
Thank you for joining me on this fun Tea Party adventure!  I hope it inspires you to invite someone over for conversation and tea...or whatever it is you enjoy...remembering to enjoy each moment, as they pass by much quicker than you think.

Finally, as I conclude this series, let me leave you with the scripture that was the cornerstone of our tea party: 
"Be thou an example of the believers, in word, in conversation, in charity, in spirit, in faith, in purity."  I Timothy 4:12

Blessings, Lisa