Saturday, August 20, 2011

Thinking of Grandma


Three generations: Mom, G'ma, & I
I love my Grandma!  She is such a classy lady, and so much fun!  One of my favorite outings with her was going to see my favorite magician, David Copperfield.  He was walking through the audience looking for a volunteer and I was on the end of the aisle.  He slowed down before walking just past me -- G'ma and I were like school girls.  LOL...that was a while ago, but we had a good laugh about it.  In October, my G'ma, Mom, my sister Beth, and I are all going to Frankenmuth, MI and I am so excited!  It's an annual event for Mom & G'ma and I've only been able to go with them once, but I out shopped them at the time.  My guess is that they've both recouped enough for Beth & I to join them--should be fun.  hee hee.

Anyway, I thought I'd pop in with a card I made for my Grandmother.  I used Cricut's Mother's Day 2010 cart to cut out the frames & the phrase "Grandma" w/shadow from coordinating cardstock, by My Mind's Eye -- I used foam dots under Grandma to add dimension.  If you look closely you'll see the off white part of the frame is a perfect fit on the oval edge, but on the deco edge I took a pair of scissors and hand cut that edge to the thickness I was wanting it to be, to show more of the paisley effect.  I like it wonky & a bit off center, so I wasn't too careful with my precision -- adds to the homemade effect.  =)  I added some inking to the edges of the card, and finished it off with a few rhinestones.

My other grandparents have already passed on, but I'm so glad I still have this time with my Grandma -- I hope I never take that time for granted. 

I hope you're enjoying time with your loved ones today.
Blessings, Lisa

Tuesday, August 16, 2011

SNT Tuesday - Organized Embellies

Hello blogger friends!  As I'm enjoying my cuppa Typhoo English tea, I'm thinking about the day ahead and all the fun projects I'm working on.  My young nephew's book is first on my agenda to finish -- and I'm hoping to do a YouTube demo showing his interactive book once completed.  That's about all I can say on that for now...but keep checking in, I'm hoping to have it posted by next week (fingers crossed)!

The handles fold down flat for optimizing storage space.
For now I have a great tip about how I organize my small embellishments & embossing powders which makes them also easy to transport.  It's one of the few organizing products I own that it's rare to find a sale on.  But I've not found anything else to compare to their  value, as yet.  Whenever I open one of them up at a crop I get lots of Ooo's & Ahhh's over the vast number of embellishments that fit inside.  They are made by the Close To My Heart (CTMH) company, and are called "My Accents Organizer" ($17.95).  They are 2" in depth, measure 12" x 10", have a handle for easy carrying, and hold 60 clear "Craft Jars" sold separately in sets of six ($3.50). 

UNFORTUNATELY, the organizers are no longer in their catalog for sale (the craft jars are still available).  I called my local rep to ask about it and she is putting out the word to some other consultants if they have any left to sell, or if they have any used ones at a reduced price for sale.  You can contact her directly on her website if you're interested, and she'll get back with you right away - Briana's CTMH website is ---> HERE

A couple other tips on finding these organizers would be to check out the Consultant Locator for reps in your local area to see if they are able to obtain any for you.  Periodically check Ebay -- at the writing of this, Ebay has two available (search: CTMH organizers).  Local thrift shops/garage sales might be another place to check as well.  I found one of my organizers at the local thrift shop for $5.00--I admit, that was a great find.

SPECIAL NOTE TO CTMH CONSULTANTS -- if you have some of these organizers left to sell, new or used, please comment on this post with your web address or email so others that may be interested can contact you.

Alternatively, if you aren't able to afford these organizers, or if you are unable to find them, -- maybe this posting will give you some ideas about what type of storage to look for to give you similar results.

The handles make it so easy for transporting to crops!
I labeled the front of my organizers with what I have in them, and have them stacked on a bookshelf for easy access.   Most of my smaller embellishments fit in these small jars such as: brads, eyelets, buttons, baubles/dew drops, & miscellaneous type items.  I also have the majority of my embossing powders portioned out in the small clear jars, & labeled with a Sharpie -- I keep the regular sized jars put away in a separate drawer until I need to refill the jars.

Embossing Powders, Baubles, & more
A great tip for buying embossing powders is to find a friend, split the cost,
and share the powder using small jars -- the powders go a long way and this is a good
way to experiment with a lot of different colors, while helping your money go further.
Brads, Buttons, & Confetti
A surprising amount of fun goodies fit into these small jars!
Eyelets & Miscellaneous items
This was the one I found at the Thrift Store for $5. I had an extra eyelet setter
I wasn't using, and added it to this box -- handy to have, just in case.
I don't get as much use out of my Acrylic Block organizer anymore (though I keep them, as I like the weight of them for some stamp impressions).  I've since moved to using Tim Holtz' Grid Blocks.  These are FABULOUS, come in a great variety of sizes, and take up very little room.  Tim is sharing a great way to store these on his blog today that you'll love--I think he said it cost him 69 cents for the storage!  I'll be sharing my storage idea for stamps & such next week (stay tuned).

I don't have all the acrylic blocks filled with CTMH blocks, but this
was another great thrift store find, I forgot about, I didn't want to pass up.
The bookshelf I keep these on is in the closet.  When my craft room is cleaned up nicely, it still makes a great, small extra bedroom for guests.  I'll be showing my workspace sometime next month, and you'll get the big picture of why I need to find creative solutions for organization.

Thanks for hanging out with me today. 
Happy Dayz --  Lisa

Sunday, August 14, 2011

Krafty Paper Find

It's funny how you can find things in the least likely place.  I was walking through Borders bookstore (which is closing down) and noticed a bookshelf with odds & ends on clearance -- and that's where I found it. 

Several sheets of Kraft wrapping paper by Paperchase--exclusive to Borders apparently, as I haven't been able to find anymore.  Needless to say I bought what they had (3 large sheets) for $1 each.  Not too shabby, eh? 

What's so cool about this Kraft paper is that it's got a debossed metallic butterfly & flower design on the front side, and the back side is a slick embossed design -- which lends itself to a lot of versatility when combined with inks & such. 

So anyway, I put together a card with this paper as both the mat and the underlay on the butterfly wings (Fanciful Flight die cut by Tim Holtz).    To pop up the butterfly I gently curled the wings and added glue dots to hold in place; foam squares added dimension to the body.  I glued some fringe & black lace at the bottom, and adhered clear alpha stickers for the title, "Happy Dayz".  

Normally my mat would be in a complement pattern/color,
but I liked thinking that the butterfly blended into its surroundings.

Most of the work was already done in this great Kraft paper find -- I can't imagine using it as wrapping paper now, though it's possible.  =)

See ya soon...Lisa

Saturday, August 13, 2011

Purple Petal Power

I have a couple quick birthday cards to show today using some petals from a bouquet of silk flowers I picked up on sale.  I was initially drawn to this dark purple bunch because the of the intense color.  But because I can't really go through a store without touching everything, I discovered that the petals had a soft velvety feel to them on the dark side, and a crunchy nylon feel on the side with the lighter hue.  So I bought them!  I was thinking they would look lovely on a set of handmade notecards. 
In the meantime, I needed a couple of birthday cards so I decided to give the flower petals a test run.  What's great about this bouquet is that I was able to use both front/back sides of the petal for some additional variance in color & texture. 

I used a basic light gray cardstock for the card base and added a mat using an older style paper from Anna Griffin's collection.  I detoured the color for the fibers to a teal as opposed to the hue of green shown in the silk leaves -- I just liked the way it added a bit more intense color to the cards (if you crop out the green leaves in the background, the teal looks so much better-LoL).  I tied to the bow to resemble leaves, used brads to secure the flower petals, added a bit of tinsel glitter to the fibers on one of the cards, and finished with three small rhinestones.  For the quotes on the front of the cards, I used my own handwriting and a sharpie following the stems of the flowers on the designer paper.

What a difference the Glossy Accents make -- IMO

After I took the initial picture for this blog post I just thought something was missing.  So I decided to add some Glossy Accents to some of the flower elements on the designer paper to finish the look.  Once the Glossy Accents is dry it gives it a raised glassy effect -- which I liked as a "filler" for the look of the card.


I already have a few ideas brewin' for some other projects using these flowers -- I'm thinking I'll save those for a rainy day.  =)

Happy Weekend!  Lisa

Thursday, August 11, 2011

SNT Tuesday - Organizing Paper Stax

On Tuesday I sat down to upload my tutorial, and my computer decided it was time to bail out--we knew this was coming, but the timing wasn't good.  I guess the blessing about the whole thing is 1. My DH took off work for two days (for his birthday--LOL), and 2. that not even 5 minutes before it went kaplooie I backed up all the files I use on a daily basis, pictures and such (which I never do, but should), and 3. I really needed a new PC!  My Dad helped Chris build that one back in '04-'05, so I had some attachment to it since he passed away, but it had really started lacking in agility.  =)  Anyway...all that to say, I finally got my new computer up and running and I'm finally posting my Tuesday tutorial--on Thursday. 

Last week's tutorial was about organizing cardstock scraps, this week I'm showing you how I organize my 12"x12" cardstock.  A few years ago I came across a sale on ArtBin's 12x12 paper containers (I believe I have the "standard" size satchel - the inside usable space is about 13 1/2" x 13 1/2", with just over 3" in depth).  I found that I like these particular paper containers because the two front locks have stayed secure with excessive usage, they have a sturdy handle for carrying, they have divider tabs & labels, made from acid free plastic, and stack without bowing into each other with their weight. 

I've been pleased with mine, and I currently have them laying flat & stacked under my sewing machine table.  They slide easily on the carpet, so when I want to use my sewing machine (which isn't often as yet) I just slide them off to the side.  I keep the majority of my printed paper/cardstock (CS) in these bins, as well as 12x12 die cuts, & some specialty solid CS.

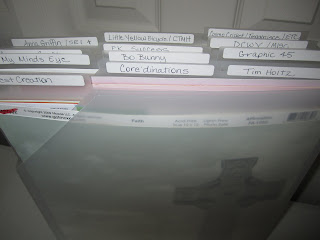
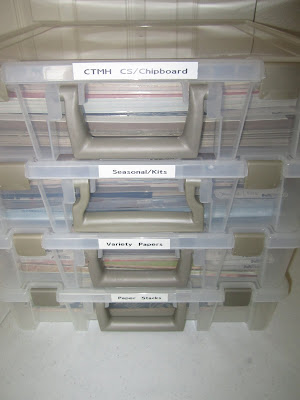
I label the outside to show the bulk of what is inside

Then I label the lid to show what file labels are inside
 
All this fits inside one bin!
This bin holds my paper stacks


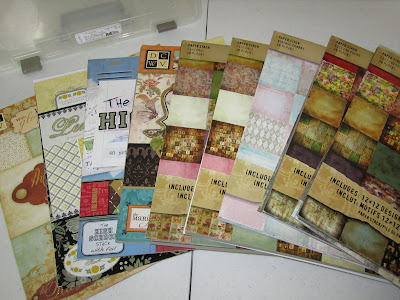
This bin I have sorted with a variety of papers that I organized into categories.
Romance, Travel, Flowers, Shabby Chic, Food, Specialty, & Die Cuts (peek-a-boos)
When I was doing a lot of teaching, I kept American Craft (AC) CS on hand so that I could easily match my solid CS with most designer papers that the local scrapbook store had on hand.  AC has their solid CS separated into theme colored stacks: seasons, pastels, tropicals, earth tones, primaries, etc.  I like that you can remove the top of the cardboard packaging and you have a vertical file holder of colored CS.  So  I took what I had left (about 4 packs) and re-packaged them according to colors (ie. the Tropical file now holds my greens).  I keep these, and an accordion file with all other 12x12 colored CS close by, standing upright next to one of my cabinets. 

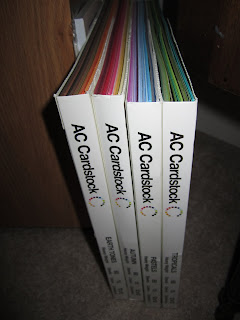
American Crafts re-organized by color, solid cardstock
 
This according file was originally made to hold 12x12 papers & layouts
specifically for taking to crops.  But I like it holding all my extra variety of solid CS.

I also have another Cropper Hopper vertical file, like I showed organizing my scraps in last week's tutorial, that I use for Name Brand/Designer papers that I know I'll be using frequently.  Besides my scraps file, this vertical file also stays next to my desk.  This is especially nice to have accessible for when I want to make scrapbook pages, or when I need designer paper larger than my scraps. 

vertical file of designer paper I use regularly
As for my ArtBin containers - if you go to a lot of crops, the handles are great for carrying so that you can put in what you need for the scrapbook pages you're working on;  or you could use it to carry a variety of tools, embellishments, sticker packs, adhesives, etc. (lots of stuff); or instead of sifting through your paper choices, you could bring the whole container of paper stash. 

The downside of these bins, and why I may eventually go to the vertical files like my designer paper stash, is that it can be a pain to dig through the papers that are on the bottom of the box--especially if you have arthritic hands.  The best solution I've found in dealing with that issue is to lay a folded towel, or pillow, on your lap (to protect your legs from the box hinges) and set the box on your lap with the back of the box leaning against your desk and the lid opening towards your body (handle at top), and look through the papers like you would an open vertical file.  I've found this to be SO much easier to find what you're looking for, and the weight of the paper isn't so heavy on your wrists. 

holding your ArtBin vertically is an easier way to look through your papers
 As you can tell, I have several different methods for organizing all my 12x12 papers.  There are other, possibly better, ways such as buying a specifically made paper stacking unit that might be best if you have the space allowance.  However, part of the whole storage/organization concept is having a place to put it.  I have to think creatively when working in a smaller workspace that doubles as a bedroom, so I use what I have--and of course, buy on sale.  I take time to look around my space and see if I have any nooks & crannies that I might be able to use, then I find a storage solution that fits that space. 

Hopefully this will give you some ideas about using space & storage interchangeably to create the best solution for you.  Thanks for stopping by ~

Happy Dayz & Crafty Ways  ~  Lisa

Friday, August 5, 2011

Winter Woodland's Tea Sampler Box

Hi guys!  I'm back today with a quick tutorial using the Cricut.  I was looking for a small, cute box to put some tea in to send to a friend and I saw one of the 3D buildings on the Winter Woodland cartridge that I thought would be perfect.  The building was originally meant to be a church, but that's where you can use your imagination.  =) 

Using cardstock from the Shabby Chic collection by Tim Holtz, I used the Fit-to-Page function to cut out two 3dBldg2 (one of the cuts was made using the shift key, and was for the solid cut that fits inside the box).  There is a roof, steeple, & doors that could've been cut, but I chose to simplify it with only the two cuts. 

In the back of the booklet for Winter Woodland there are directions on how to assemble the 3D village buildings.  For my Tea Room, I assembled the solid shape box first, added foam dot adhesives, then wrapped the outside building shape with the cutouts around the the solid shaped box to seal it together.  By the way...you don't have to add foam dots as I did.  I just wanted to add some dimension to the cutout portions.

I used Glaze pens to draw on the detailed accents such as the tea room sign, door, bushes, & trees.  I love these 3D type gel pens, as they give the look & feel of embossing after they dry.  I also added a bit of lace at the top of the awning both in front & back, and on the sides.


The sides were originally meant to be stained glass windows, but I decided to give them the look of trees instead (yes, my imagination was at play here).  I used the Glaze pens again, and since they are translucent you're able to see the pattern of the cardstock through the green of the trees.  I rather liked the look of it -- but I bet it would be great as stained glass too, so I'll have to remember that for another project. 

Because I wanted to use this as a Tea Sampler box, I added a bottom enclosure.   To determine the size of the cardstock I should cut, I simply drew around the the base of the building -- I subtracted 1/4" from two neighboring sides, and then added a 1/2" to all four sides before cutting my cardstock.  Then I scored each side of the cardstock at 1/2" and snipped off the corners where the scoring intersected (that just helps it not to be bulky fitting it into the base).  I hope that makes sense -- basically you want the bottom insert to be about 1/8" smaller all around so it fits easily into the base since the foam dots will add thickness to the box.  The extra 1/2" is to create tabs to hold the base in place -- I applied score tape to the four scored sides and adhered it to the inside base of the building.

Just a little imagination and I was able to create a quick Tea Sampler Box from just three pieces of cardstock.  I added a variety of tea samples & it fit neatly into a cellophane bag with ribbon.  I think these would be great to make as party gifts too.  You could customize it to be a coffee shop with Starbucks samplers, or a Candy Store for sweets...Oh the possibilities!  =)

Thanks for peeking in today.  Hope your weekend is fabulous!  Lisa

Tuesday, August 2, 2011

SNT Tuesday - Organizing those Scraps

Quick & Scrappy TOY card
So many scraps, so little time!  I'm finally sitting down, with a cuppa Typhoo tea (my favorite English tea to drink when I need to get a burst of energy), for my Sip n' Tip Tuesday tutorial.  I totally missed the month of July for my SNT Tuesdays--so I'm making up for it this month.  Instead of my bi-monthly tutes, I'll be sharing an organizational tutorial for each Tuesday this month!  And so, without further ado...let's organize those scraps! 

I have so many scraps that I can always make a quick & "scrappy" card just from my scrapped cardstock (CS).  Everyone has a different idea on what works best for their scraps -- but I'm going to share what I found that has worked best for me.  For years I just threw all my paper scraps into a plastic bin -- and while fun to go through, it took too much time to find something to match whatever I happened to be working on.  But then I found this 'little beauty' -- my handy vertical paper filer called the Cropper Hopper Value Pack is the first place I go when I need to color match a project or card, and it is so easy to set up and actually keep organized.  I keep it completely accessible right next to my desk and have it organized by color.  This particular Cropper Hopper product is a plastic 12x12 vertical file pocket that holds 4 - 12" x 12" smaller width pockets with three dividers for each pocket. That's 12 tabbed pockets...plus the extra pocket behind the third tab of each pocket gives you an additional divider area.  The value pack runs about $25 retail, but if you get it at Michaels or JoAnn Fabric's you can almost always find a 40-50% off coupon.  Amazon.com usually has them at a discounted price as well...sometimes even more that 50% off.


My scraps are organized into the 4 tabbed pockets as follows:
(Note:  I use the term 'Deco' for decorative/patterned CS)

1. Blue/Green Solids
    Red/Pink Solids
    Yellow/Orange/Purple Solids
2. Brown/Ivory Solids
    Black/White Solids
    Specialty/Release Papers (ie. mulberry, mirror, coated, etc)
3. Blue/Green Deco
    Red/Pink Deco
    Yellow/Orange/Purple Deco
4. Brown/Ivory Deco
    Black/White Deco
    Glitter/Embossed *
* Behind the Glitter file tab is where I keep my vellum & transparency papers.


It's always subjective how best to file decorative/patterned papers when there are a variety of colors present.  I usually try to file them according to the dominate color.  If it's two-sided CS and one side is a solid color, I still file them with the Deco CS but according to the color on the solid side. 

I always reach for my Scrap File first when I'm looking for coordinating papers for a variety of projects--which has really helped me use what I have, without so much scrapbook paper wasted.  Periodically the file will get full, so I'll go through each tabbed divider and pull out the larger pieces of  CS and cut them into 8 1/2" x 5 1/2" pieces--I'll fold these papers in half for quick cards later; or cut a variety of papers into 4" x 5 1/4" for quick card mats.  I'll then file these card components in a separate storage area.

The number one question I usually get asked in my classes about saving scraps:  "How small are the scraps you save?"  For myself,  I rarely save any scraps smaller than 2"x2", which is still pretty small -- most of my usable scraps run larger than 4". 

If you already have a lot of scraps, you might want to purge the smaller ones out, and cut some of the larger ones down -- When I purge my scrap file of the larger pieces (as stated above), I also end up throwing away any smaller pieces I don't think I'll use.  But if you're a papercrafter that does a lot of paper-piecing you might want to save extra small pieces into a separate storage compartment so they don't get lost amongst the larger ones.

I hope this helps you to develop some organization for your scraps -- you'll be surprised how much more you'll be able to do when your scraps aren't flying in so many directions.  If you have a specific way you like to organize your scraps, I'd love for you to leave it as a comment. 

And finally, I've made a new Page for my SNT Tuesday Tutorials.  You will now be able to find the complete list of tutes by clicking on "SipN'Tip Tuesdays" under my Title Header.

Thanks for popping in -- Lisa