Saturday, March 31, 2012

March Mosaic Fly-Bye


Can you believe it's the last day of March?!  Wow...it seems like it just flew away.  And -- no different than last month, I'm posting my March tag, for Tim Holtz' 12 Tags of 2012, on the last day.  I'm just glad I made it.  =)

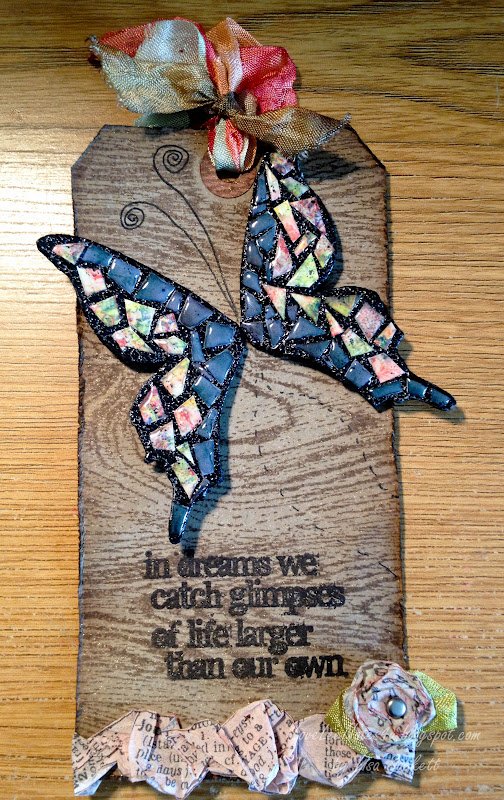
I must confess, I wasn't too sure about trying this mosaic technique -- in fact, I had my doubts I'd even like it when I finished.  But I'm definitely a believer now.  I love it!  It did take more time that I usually like to take (I'm rather impatient waiting for glue to dry), but the results are so cool -- it really feels like a grouted mosaic.  Check out Tim's blog HERE for step-by-step instructions on how to complete this amazing transformation.

I changed mine up just a bit by using a pre-cut grungeboard butterfly, and black embossing powder for the grout (which I flicked off quite a bit to give it a gravelly look).  I also added tissue tape after tinting it with fired brick stain -- wiping most of it off to give it a pink hue, and making a portion of it into a mini paper flower.  The quote stamp I used is from TH Flights of Fancy. 

Any plans for April Fools tomorrow?  One year I put a rubber-band around the kitchen sink faucet sprayer and got my husband and both boys really wet when they turned on the faucet.  I thought it was funny, but they didn't really share my sentiment.  LOL

Ah well, life is fun -- enjoy it!  Lisa

Friday, March 30, 2012

THCC101 Wrap Up

Wrapping up Tim Holtz Creative Chemistry 101 with my last technique tag, and I love it.  Got to play with Stickles, which I love.  I actually had my tag finished this morning and only needed the Rock Candy Distress Stickles to finish it off.  Do you know, it was no where to be found among my craft supplies...so I had to wait until after work, pick some up, and get 'er done.


Supplies used for this Tag:  TH wallpaper stamp, weathered wood distress stain, iced spruce & walnut stain distress ink, & rock candy distress stickles

I hope you enjoyed these past two weeks look into the class I've been taking.  I guess you never realize how much you can still learn (I'm sure I said that before).   Tim Holtz has a look into the class if you'd like a peek "inside".  You can check it out HERE on his blog...and by the way, it's never too late to take these classes.  Yep, you can join at any time!  There won't be any live forums as they will be closed, but you can read all the forum posts, look at the gallery, watch the videos, learn the techniques, and still download the PDFs  --  all with continued lifetime access!  Pretty cool, eh?!

I have a several projects on the back burner I'm hoping to get posted by next week, so I hope you'll come back again and visit real soon.

See ya soon!  Lisa

Thursday, March 29, 2012

An Imperfectly Perfect Day

Perfect Pearls...if you didn't know by now...I love these shimmery powders!  We're winding down with only one more day left of Tim Holtz Creative Chemistry class.  Today is one of my favorites because we're playing with Perfect Pearls (PPrls), especially since once they meet water they're permanent --gotta love that. 


Tim Holtz says to "embrace your imperfections"...and so here's a quick breakdown of my "imperfectly, perfect" tag elements:

Tag 1 - Re-inkers w/PPrls:  Tumbled Glass w/Turquoise, Spun Sugar w/Berry Twist, Barn Door w/Forever Red

Tag 2 - Hampton Art Stamps-Correspondence Collage; distress inks: Faded Jeans, Fired Brick, & Walnut Stain; Blue Smoke PPrls; wild honey distress stain

Tag 3 - distress ink:  iced spruce, evergreen bough, festive berries, ripe persimmon; PPrls: Sunflower Sparkle (no surprise there-my fave), Forever Blue, Forever Red, Blue Patina


I also made another Swatch Book for my Perfect Pearls, but I didn't see a swatch chart on Ranger's site, so I made one in Word.  If I find that Ranger has a swatch chart and I just missed it I'll edit this post with a link.  In the meantime, if anyone wants a copy of the chart I made emailed to them, just send me an email me, and I'll get one out to you. 

On the other side of the swatch book I added my alcohol inks.  I made it the same way as the others, but I did my color swatches on glossy cardstock instead and added it to the book.


Thanks for stopping back in today -- Hope you're having a "Perfectly" wonderful day!  Lisa

Wednesday, March 28, 2012

All Cracked Up!

I gotta tell ya, the Creative Chemistry classes with Tim Holtz have been great -- but today he added another side of his humor that "cracked" me up.  Apropos considering we are working with crackle paints today, and paint techniques.   

I've been posting tags throughout this course for the techniques we're learning, but what you don't see is that the backs of the tags have the quick-fire directions from Tim, plus I make sure to add the colors & products I used.  I'll be keeping these in a specialty book I made for easy access & reminders.  I hope to revist the book in a later post, but for now, here are the tags I made & what I used on them (tags listed from left to right).


Tag 1 - ATC size Sticky back Canvas (white), Scrolls Work Lighthouse stamp, TH Shabby French flourish stamp, TH City Central perspective stamp, Snow Cap paint dabber, Distress Stains (DS): weathered wood, & broken china.

Tag 2 - Broken China distress crackle paint, TH Air Travel stamp set, DS: picket fence, broken china, wild honey, fired brick, spun sugar, weathered wood; Distress Ink: walnut stain, and black Archival ink.

Tag 3 - TH grungeboard harlequin heart, crown, & butterfly wing shapes; Rock Candy distress crackle paint; TH retro stamp set, DS/ink: same as tag 2, snow cap paint dabber

Now, I better give my dogs some attention...or treats -- that usually perks them up! 
Thanks for peeking in today.  Lisa

Tuesday, March 27, 2012

Embossing Powdered Tags

These tags are my offerings for today's Creative Chemistry techniques with Tim Holtz.  Today we played with embossing powder (EP), one of my favorite products for a dramatic effect & dimension.  My first tag could use a little more work, but that's where more play time in the craft room will help.  I'm headed out to work soon, so this is all the time I had for today. 

I only had small (#5) manila tags so I attached them to my larger tags so I'll have uniformity when I put them all together.  Pretty cool that Tim added "quick direction" tags to his PDFs, so that each of the tags I create have a mini tutorial on back -- fabulous idea!  I also like to list my ink colors & products on the back, which I've included below in case you're interested in the colors/products used (tags - left to right) . 

Tag 1 - Melissa Frances sillouette flower stamp; distress inks:  mustard seed, pine needles, bundled sage, black soot, & walnut ink; Ranger clear EP

Tag 2 - Distress inks:  iced spruce, gathered twigs, walnut stain, vintage photo, pumice stone, & stormy sky; Ranger clear EP

Tag 3 - Tim Holtz Shabby French flourish stamp; distress inks:  peeled paint, faded jeans, wild honey, & walnut stain; distress EP vintage photo

Hope you're having plenty of sunshine today!  TFSB, Lisa

Monday, March 26, 2012

Marking A New Path -- A Little Outside the Lines

Today was Day 6 of Tim Holtz Creative Chemistry class and we got to delve into Distress Markers.  I love them...I only wish I had more.  =)  But I have enough to play with and that keeps me happy.  As always, it doesn't matter how much you think you know about a product or a technique, there's always something new to learn.  I'm absolutely loving these classes.  AND I found out that you can still take the class anytime this year as all the material will be recorded and the class members have lifetime access to it.  Pretty cool since there's a lot of information, including detailed PDF's.  If you're interested in the class you can check it out HERE

I chose to work with this awesome stamp set by Our Daily Bread designs to honor my husband.  He's in his 21st year with the Air Force and decisions about the not to distant future weigh constantly on our mind -- lots to think about. 

The three stamped images represent 1st, 2nd, & 3rd generation stamping (in order as above).  The first two were stamped on Specialty Stamping paper by Ranger (definitely love this cardstock), and the 3rd generation was stamped on watercolor paper.  The Distress Markers I used were:  faded jeans, peeled paint, pumice stone, tea dye.  The sentiments were stamped with black Archival.

 For my "practice" variations, based on a variety of techniques, I used the shell stamp by Stampin Up.  The first tag being on watercolor paper, and the second on the specialty stamping paper.  You can definitely tell a difference in the effects of the two papers.  But please don't judge me too harshly on my practice tags, as I'm still...umm, practicing.

So here's a bit more of me playing around with the Hero Arts/Sizzix Butterfly stamp & cut set.  I created these about a week prior to class starting and I LOVE the color combination of the Peeled Paint & Faded Jeans markers.  These are just stamped onto plain white cardstock.  And now for the new technique I picked up on the fly while playing around....ready for it??


 I inked my stamp with the markers, spritz a light misting of Ranger's water-based stamp cleaner (bubble gum scented) onto the stamp, then stamped it on the plain white cardstock & heat dried it.  It's really a cool muted effect with a twist...it has a faux embossed feel to it when dry!  I love it...it's different.  And here's a really cool idea...now Mr. Tim Holtz has something he can do with Ranger's stamp cleaner!  =D 

Take time to create something a little outside of the lines, you just might discover something new.
Thanks for checking in...Lisa

Sunday, March 25, 2012

Making a Distress Color Swatch Book - Revisited

Distress Ink Swatch Book
I originally posted this book in February last year (you can see the original post HERE), but there were no clear directions until now.  =)  In addition, I've added more of the Tim Holtz Distress line of products to this same booklet:  re-inkers, stains, markers, crackle paint, stickles, & embossing powder.  Yep...all in this one, little, handy-dandy, 4x4 booklet!

Finally, here are the written directions.  And for further clarification, you can check out my YouTube video below...or HERE, if you aren't able to see it in this post.

Making a Distress Swatch Book

-        Cut cardstock (CS)  8” x 12” \\ Score on the vertical (8”) side @ 4”  \\ Score on the horizontal (12”) side at 4” & 8”

-        With CS vertical, cut on the center score line from top edge to 1st horizontal score line.  Rotate CS 180 degrees and repeat.  (DO NOT CUT INTO CENTER SECTION)

-        With CS vertical, fold top of CS on first horizontal score line toward center.

-        Trim 1/16” off bottom unfolded edge.  Then fold bottom of CS on nearest horizontal line (2nd from top) up toward the center.

-        Fold left side of CS booklet around to the backside, so that the right side of the cardstock booklet becomes the front cover.

-        Print a swatch sheet from Ranger’s website - HERE (click on the product, then download the swatch chart PDF.

(I recommend printing onto brochure paper or matte coated paper (something thicker than copy paper). 

-        Cut swatch sheet as desired to fit into sections of swatch book.  Cut title of swatch sheet for front of swatch book.

-          Embellish as desired.

Swatch Book for Liquid Pearls & Paint Dabbers
To fill this book up with color is on my list of Wants!  =)

I hope you guys enjoy the video -- I'm still trying to learn the best way to film without wearing my husband's arm out too quickly. =)  I try to fit a lot in on this video as quick as I can, but it's still a ten minute video.  Hopefully you'll find the information useful. 


Remember that you can customize these books to fit your taste.   The book is quick to make -- it's adding your colors that might take a bit more time.  

Thanks for popping in!  Lisa

Creative Chemistry Days 4 & 5

I've really been loving taking Tim Holtz online course, Creative Chemistry 101.  I can't get over how much I am Still learning!  I thought I'd show the tags I made for Days 4 & 5 based on techniques we've learned.  It's a two week course, and I'm so excited to start another round of classes starting tomorrow.   Online Card Classes has a wide variety of online classes which you can check out -- I've been really impressed with their site so far.

 DAY 4 - (tags, left to right)

Tag 1 - Stampabilities, See the World stamp.  I was inspired to show one of the first stamps I bought which fueled my desire to start stamping.
Tag 2 - Dylusions Luscious Leaves (5x8) stencil
Tag 3 - Tim Holtz Winter Sketchbook stamp set (never too early to start on cards & tags)


DAY 5

Tag 1 - TH Air Travel stamp set & TH wildflower stamp
Tag 2 - TH Letters to Santa stamp set & TH bird stamp (can you tell some of my writing is upside down?  oops)
Tag 3 - TH Umbrella Man stamp & TH retro stamps

Thanks for checking in today.  Embrace the ink!  Lisa

Thursday, March 22, 2012

Distress Marker Quick Tip Video

Hello friends.  I made a quick video today showing a couple simple tips:  keeping your Distress Markers fresh longer, and showing how I label mine.  I've been teaching Distress Marker techniques at our LSS and I'll be sharing some of my ideas on my blog as well.  There is SO much you can do with these lovely markers, and in teaching a two hour class it's just not enough time to cover it all.  I created a four page handout for my students and that only covered some of the basics plus a few tricks I came up with just from playing around.

There are 36 markers that match the Tim Holtz Distress Ink colors, plus a white opaque Picket Fence as well (37 markers total).  If you're just getting started with the Distress Markers and aren't buying the complete set, I recommend starting off with Black Soot, Picket Fence, and 2-3 other colors you would use that blend nicely together.  My favorite combination, at the moment, is Faded Jeans & Peeled Paint...with a touch of Worn Lipstick.  Yeah, I'm not sure how the Worn Lipstick fits in there either, but I just love those colors.  =)

If you're new to the Distress Markers, Noell Hyman at Paperclipping.com has a great video with Tim Holtz demonstrating his new Distress Markers at CHA Winter 2012.  You can watch it HEREScraptime has a video with Tim demonstrating at CHA as well, which you can view HERE.


Thanks for stopping by, Lisa

Wednesday, March 21, 2012

It's From Her Treasure

My Treasure Stash!

I love the german scrap!

Not too long ago my fellow tea drinker, friend, and blogger bud, Gerri (It's All Treasure) sent out some lovely packages of mixed media goodies to see what others would come up with from her stash of treasures. I was blessed to received some of those treasures, and was anxious to play. We only had to use a few of the items, but I got a bit carried away and used quite a lot. I ended up creating a tag booklet out of a manila folder...with lots of pockets to hold tags. =)


Blogger is being difficult and not letting post some of the photos of this project, but I'll have another post, hopefully this weekend, with a tutorial for making this booklet, and more photos.


The booklet first opens up to this 2 page spread.  The left & right side open outward to a 4 page spread, which is the photo Blogger isn't letting me post for some reason. 


More pockets for more tags!
I made the tassels on the tags from the metallic threads on the card from the stash.


This is the left side of the 4 page spread.  The lighting makes this page look pretty yellow for some reason, but its coloring is a closer comparison to the next photo.


And LOTS more pocket space.
The mini tags were actually black & white post-it notes.  I added some vintage color distress ink, stamped some flourishes, & matted them to black cardstock.


This is the right side of the 4 page spread.


With more tags, of course. 


There were several more photos I wasn't able to add due to a problem with Blogger, but hopefully you get the idea.  Make sure you take some time to stop over to Gerri's blog, "It's All Treasure", to see what the others made with their treasures.  And thank you for popping in to see mine!

Enjoy today!  Lisa


Class is in Session

I'm very excited to finally be able to take one of Tim Holtz' classes!  He's teaching an online course called Creative Chemistry 101, and it's already an amazing class.  I love that I'll have access to all the class info for a lifetime, including PDFs, videos, & more.  There may still time to jump in, as today is only Day 3, and you can work at your own pace.  For more information you can check it out on Tim's blog HERE, where you can watch a "preview" video and find a link for the class. 

Now onto my class contributions -- I created the following tags using a variety of techniques.  But it's so much more than just learning the techniques.  I'm actually learning the "Creative Chemistry" behind the scenes.  And LOVING it! 

Day 2

DI - Faded Jeans, Peeled Paint, Worn Lipstick, & Walnut Stain

DI - Pine Needles, Stormy Sky, Fired Brick, Peeled Paint, Faded Jeans,
Worn Lipstick, Rusty Hinge, Seedless Preserves, & Pumice Stone

DI - Seedless Preserves, Broken China, Evergreen Bough, Rusty Hinge,
Fired Brick, Dried Marigold, & Walnut Stain

Day 3 (one tag MIA...will catch back up with that one)

This one is my Favorite!
AI - Wild Plum, Caramel, Cloudy Blue, Lettuce, & Copper
and Archival Black
TH "On The Railroad" stamp set

Texture Trade - TH Umbrella Man
DI - Weathered Wood, & Stormy Sky
TH "Reflections" stamp set

Thank you for stopping by!  It's never too late to get inky...Lisa